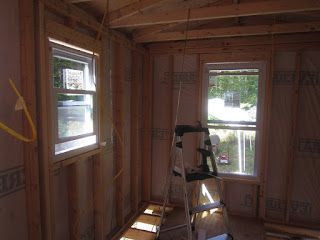
First, an update of the pictures I wanted to take yesterday. There is a lot more light inside now. It used to be pretty dark with the door closed.

A better picture of the window.

The edges are perfectly flush.

All the windows are now installed. I did run out of shims and had to make a Home Depot trip, but the windows went in pretty quickly once I made sure that all the openings were wide enough. The big window is big.

This is what the inside looks like with the new windows installed.


I sealed the first one with caulk before putting any of the filler foam in. I didn't want to have to deal with the foam squirting out the front when I went to seal it, but after using two tubes of caulk on the first window, I decided dealing with the foam was the better option, I wasn't trying to fill the entire crevice with caulk, but I didn't have much choice on the top or bottom. It took two tubes to do this window. Not very pretty, but I have never been that great at caulking. It will be covered with trim in the end anyways. It was so hot that you had less than five minutes before the caulk started to harden.

Afterwards, I put in the foam sealer. I was a bit more careful than I was when I did the door. Most of them came out really nice. Very little overfill.

While I was waiting for the foam to set up, I decided to do something about the disaster that was on the slab.

I got everything broken down and cleaned up.

I have a lot of cardboard now.

I also pulled off another bag of trash. That makes two this week, but hopefully the landlord won't notice.

By the end of the day I had three of the windows sealed. I also filled in defects in the siding where I saw them.


I tried to get the angle correction piece that I am not using since I don't have tilted sills to cover the bottom to minimize the caulking required, but I couldn't make it latch, it isn't intended to be installed here and it shows. The outer lip is too thick.

Looking back, I didn't use the header expanders either since the directions said I didn't need them, but they would have made the sealing much easier. They are a vinyl piece that sits over the top of the window, and would have consumed the top and bottom gap if I had played it right. Oh well, I will have to remember that for next time.
I didn't complete the two west windows because I ran out of foam and caulk, but they should be pretty quick and easy to do for tomorrow. After that I guess I can install the heat pump and the task for the interior framing is complete, at which point I will resume electrical work until the new underbelly material shows up. I also have to make some trips tomorrow to make sure the well quote is still valid (I got the quote three months ago) and get things moving on a loan. I will try Mascoma first, since they hold the mortgage on the property and might be able to work with that. If not, I will try Key next since they are my primary bank. If both of those fail (I am asking for a lot of money, 30k, with no collateral after all) then things get interesting. As far as I know (though I haven't checked) I haven't seen any impact from the recent Equifax hack, so I think my credit should still be fine.
The windows and through wall things aren't done yet, so no movement on the checklist (though I fixed the gaffe from the last posting of it)
Square up the cornersAttach ceiling beamsSecure rafters and beams with hurricane tiesAttach the subflooring to the trailer frame.Sheathe the roofInstall tar paper to make the roof watertight.- Install windows and AC.
Tyvek wrap.Install roof. Including the drip edge.Install siding.- Install attic vent and AAV (AAV = air access valve for the plumbing).
- Run the rough plumbing. (includes gas line for stove)
- Run the rough electric.
- Install rodent barrier.
- *Finish the exterior. Do Skirting. *14
- *Install insulation. *14
- *Install flooring. *16
- *Install ceiling and attic insulation. *13
- *Install light fixtures. *18
- *Install paneling *13, 16
- *Complete electrical and plumbing. *20
- *Install final flooring (carpet/linoleum). *17, 20
- Install interior fixtures. When I get here, I will likely create a new list for the interior work.
I normally use about 2 tubes of caulk on a window, but that includes the inside and exterior trim.
ReplyDelete