Wednesday, August 30, 2017

More wiring.

Short update for today.  Mostly just got some more wiring done.  They are actually attached too.

I stopped at Home Depot and talked to one of the lumber guys.  I had been looking at a fiber board that was a little cheaper and claimed to be lighter, but he was definitely opposed to it.  He claimed that it was not like MDF, which is reasonably rigid, it was more like a cheap press board, which would not have the lateral strength that I was looking for, so I went with a 3/8 CDX T1-11 instead.  It is a bit heavier, but I know T1-11 is strong enough, even at only 3/8 thick.  Going with the thinner stuff is still about 600lbs, but at least it won't fall apart if the wind blows or I tow it.

I also found a beefier heat pump tonight that should suffice for what I need.  It is an Amana 9,000 BTU unit.  It has a 3.5kW strip heat built in, which is sufficient for winter.  The only downside is that it is larger (though I hadn't built the framing for the other one yet) and it requires a 240V circuit, though only a 20A so I can use the same wire I bought for the rest of the house (though I have already bought a spool of heavier wire for the other one...).  All this being said, I do still intend to put in the outlets for the space heater that I was going to supplement the other one with, just in case.  It isn't a new circuit, I was going to put it on the lights circuit, so it isn't a big cost adder, and if the heat pump heats very unevenly, I might be glad I have it.

Tuesday, August 29, 2017

Got out of work late, not much done.

I got out of work even later today than yesterday, so I didn't get much time to do anything up there today.

Tim recently replaced one of his bathroom doors, so I snagged the old one.  It is really rough, but if push comes to shove it is usable.  If I do buy new ones I can just toss it on the burn pile.


I did have enough time to get the rest of the staples put in. on the wrap.  It is now much more firmly secured.


I started to do more work on the wiring as well, but it was getting dark, and I don't have any lights in there yet.


Something I came across when I was looking up the power requirements for my heat pump was that it was 3,500 BTU strip heat.  I originally thought it was 3,500W (1 W = 3.4 BTU) so I need to rethink my heating strategy.  Unfortunately the only alternatives I have found are ridiculously oversized for the tiny home (in the range of 20,000+ BTU).  When it is operating in heat pump mode, it will be more than sufficient, but when the cold sets in, it won't be enough.  I also looked at split units, but those are very expensive.  I think what I might do instead is mount a space heater above the bathroom and laundry room doors.  I have a ceiling fan in the dining room which should help equalize the temperatures, and run them both during the cold winter months.  I don't really like the plan, but it will work and won't break the bank.

There hasn't been any movement on the to-do list, but I am hoping to pick up the siding tomorrow.  I am looking at 3/8 MDF based T1-11, but am not sure if I trust that to hold everything square.  If it is significantly lighter than the thicker (5/8) CDX I might give it a shot.  I would like something thicker, but that much 5/8 T1-11 is nearly a thousand pounds.  It is about 55-60 lbs per sheet, and I need 17 sheets.

Monday, August 28, 2017

Quiet day.

I worked later than normal, but still got up there for a little bit of work before it got dark.

First off, this is from yesterday.  The studs are all marked for the windows.


Today, the first thing I did was cut open a door.


I also ran a few more wires.  I also stopped and got some more staples and some real tape.  The cheap painters tape I have is really awful.

Sunday, August 27, 2017

Weather tight.

Today was another gorgeous day.  I didn't spend it sleeping in either.  It was very productive too.  I finished the strapping, so the attachment of the subflooring to the frame is complete.  I put in the mystery missing rafters as well.  I didn't take any pictures until the end so it was taken from underneath.


Matt came up, and we completed the roof sheathing.  As I expected, I bought one sheet too much plywood.  Oh well.


Afterwards I pretty much sent him up on the roof (he weighs half of what I do) with a roll of tar paper and a staple gun, and let him go to town on it.  He did a really nice job on it.


Tim came up and visited on his way back from dropping his son off at college, and recommended that I install the siding to firm up the walls  before I install the window framing.  My braces weren't cutting it nor were they holding it square under pressure; it wobbled a lot with Matt on the roof.  After the shock of Tim recommending something nonstandard wore off I realized he was right (as usual).  I do have all the studs marked though for cutting when their time comes.  I couldn't really get a picture of that though.

While I waited for Matt to finish up the tar paper I started doing a little wiring.  I got three of them roughed in.  I have the tacks to hold them up to the rafters, but I haven't put them in yet.


In case the last picture didn't spoil it, the reason I don't have pictures of the inside work (and others are from underneath) is because we also got the Tyvek wrap up (this isn't Tyvek, it is a cheaper brand.  House wrap is a lot more expensive than I thought)  Towards the end, we had to ration staples, since my staple gun was running out of ammo.  I will have to put more in, but that isn't a big deal, this should hold just fine.


So the outside is now completely water tight.  It isn't perfectly tight since I used staples instead of the special nails with plastic washers for the wrap and the tar paper, but it is plenty close enough for me.

Matt got bored so he folded my tarps while I was grilling.  He also brought up some goodies: a spare tote (a very nice one too), some hard drives, and there is a box of Cat6 cable as well.  I won't be running cables in the tiny home (everything on Ethernet is in the same spot) but I can use it to make custom length cables to keep the inevitable wiring disaster to a minimum.  my spool of cable ran out ages ago.


I also have a ton of spare tar paper and house wrap.  It looks like we only used about half of each of them.


That checked multiple items off the to-do list, and everything went smooth enough that we even got my wishful thinking parts done.  Matt should come up more often...  A lot of the dependencies are removed as well now.  The items in green have been started.
  1. Square up the corners
  2. Attach ceiling beams
  3. Secure rafters and beams with hurricane ties
  4. Attach the subflooring to the trailer frame.
  5. Sheathe the roof
  6. Install tar paper to make the roof watertight.
  7. *Install window framing.   *10
  8. Tyvek wrap.
  9. Install roof.
  10. Install siding.  This includes all flashing.
  11. *Install attic vent and AAV (AAV = air access valve for the plumbing). *10
  12. Run the rough plumbing. (includes gas line for stove)
  13. Run the rough electric.
  14. Install rodent barrier.
  15. *Install insulation.  *10
  16. *Install flooring.  *15
  17. *Install ceiling and attic insulation. *13
  18. *Install light fixtures.  *17
  19. *Install paneling  *13, 15
  20. *Complete electrical and plumbing.  *19
  21. *Install final flooring (carpet/linoleum).  *16, 19
  22. Install interior fixtures.  When I get here, I will likely create a new list for the interior work.

Saturday, August 26, 2017

No items completed, but a lot of progress made.

I didn't manage to check any items off the list today, but I still got a lot of stuff done.  I got a late start, since I was running a bigger sleep deficit than I thought, and didn't roll out of bed until 1030 despite going to bed at my normal time.  It was another gorgeous day though and I still managed to get a lot done, just none of them are completed.

I managed to get most of the sheathing done today.  There are still a couple of pieces left at the end.  It turns out that there are two rafters I forgot to install that I can't seemingly find, so I picked up the parts for that and will hopefully get that done tomorrow.


I even managed to get most of them in without a lot of misses.  There are still a few, but only a couple, unlike the shed where I missed with many dozen when doing the flooring and siding.  I actually marked the boards this time with where the support beam was...


I apparently miscalculated.  I thought I would need 8 sheets of plywood, but I am going to have a lot leftover.  These are the extras, and while one or maybe two will be used for the partials (you may notice above that only every other board goes all the way from ridge to wall), I will have at least two pieces, maybe three left, which is more than a sheet worth.  Oh well.


In addition, the generator ran out of gas, so I went back to attaching the flooring.  All the hurricane ties are now bolted in.  I also got some of the strapping in as well.  I didn't get this finished because I lost a nut somewhere, I only had three nuts and 4 bolts.  So I picked up another nut to finish that with since I couldn't find it.

The first strap turned out pretty ugly.


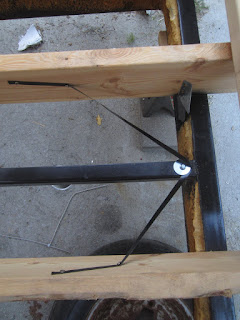
Then I figured out a better way to do it so the rest of the them look nice and probably will hold better.  They are clamped to the frame with a bolt and large fender washers, and then screwed into the subflooring.  I didn't want to bolt them directly since the bolt is 3/4 of the thickness of the strap, which would greatly weaken it.  As before, I used grade 5 bolts, so the whole thing will implode before they give up.


I have enough material for four straps, one at each corner.  I am hoping that is enough.  The plan for tomorrow is to wrap up 4 and 5, and hopefully start on 6 and 7.  I might have assistance tomorrow, Matt might come up, so we might be able to finish all of them (though that is most likely wishful thinking)
  1. Square up the corners
  2. Attach ceiling beams
  3. Secure rafters and beams with hurricane ties
  4. Attach the subflooring to the trailer frame.
    1. Only one strap remaining
  5. Sheathe the roof
    1. Only the front edge remains.
  6. *Install tar paper to make the roof watertight.  *5
  7. Install window framing.
  8. *Tyvek wrap.  *7
  9. *Install roof.  *6
  10. *Install siding.  This includes all flashing.  *8
  11. *Install attic vent and AAV (AAV = air access valve for the plumbing). *10
  12. Run the rough plumbing. (includes gas line for stove)
  13. Run the rough electric.
  14. *Install rodent barrier.  *4
  15. *Install insulation.  *10
  16. *Install flooring.  *15
  17. *Install ceiling and attic insulation. *13
  18. *Install light fixtures.  *17
  19. *Install paneling  *13, 15
  20. *Complete electrical and plumbing.  *19
  21. *Install final flooring (carpet/linoleum).  *16, 19
  22. Install interior fixtures.  When I get here, I will likely create a new list for the interior work.

Thursday, August 24, 2017

Vacation over, back to work.

Despite dragging all day and being overly tired, I managed to get back up to the property.  We got a lot of severe storms that brought a ton of rain in a hurry, so I went up and assessed the damage.  

This was the only casualty.  I popped it back together and it was fine.  

Most importantly the trailer withstood it just fine.  The tarp was a little torn up though.

The driveway didn't fare too well either.  There are a lot more ruts and they are a lot deeper.  There used to be only one.

It is really deep too, the channel is almost a foot deep.


All that said, I did get the tarp off today and got started anchoring the floor down.  

I didn't get it finished, but I have a process that works well now and should get them finished tomorrow.  As such, no changes yet on the todo list.

Wednesday, August 23, 2017

Eclipse photos and KY trip

I went down to Kentucky last weekend to watch the eclipse and catch with my family.

I took my camera (the Elph I got from Matt) and used my sister's Pentax K5.  I set up both on a tripod.  With my Elph I took an HD video of the totality, and I set up my sister's camera to take a time lapse (also called interval mode).  Unfortunately she doesn't have any nice long lenses, but I still got some decent shots.  It turned out to be a really nice plan, since once the eclipse neared totality and I started the video, everything was automatic at that point and I could actually enjoy it.

I decided to go to a small town (Adolphus KY), since I didn't want to risk any street lights or anything coming on that might be light sensor based.  Turned out to be a good plan, the place we got was really nice, and while I couldn't capture it on camera, the effect that the eclipse had on the water was pretty neat.  As we neared totality, the reflections weren't white light anymore, it was almost as if the temperature of the lighting changed.

This was the spot we set up.


Perfectly clear day.


We weren't the only ones here.  Thankfully the mother of the kids had bought a bulk pack of the glasses and gave us a couple pairs, since she had spares.


This is the setup.  We were in a creek bed, which gave entertainment to the kids, and if I had worn sandals, I would have been wading in it too.  It was hot.


Some of the weird effects the eclipse had.  Everything was crescents.


Now for the eclipse photos themselves.  I took this with my Elph with the glasses over it.  It kinda worked.


These are some of the shots I got from my sister's SLR.  Totality hadn't yet started, but you can start to see some of the brighter stars (they are just dots because I didn't have enough lens).  If Krass or anyone wants them to play with, I do have the raw files as well (I was shooting JPEG + RAW).


If you crop or zoom in on that prior one, you can actually see the outline of the moon on the right hand side.


This was the best of the totality shots.


You can see the stars if you zoom in.


Unfortunately most of the pictures (including the totality ones) are massively overexposed.  You can't trust the light meter, so I had the exposure compensation set, but clearly not low enough.  Though if I had lowered it any further, you may not have been able to see the stars.  That is what HDR mode is for, but I don't think Heather's camera will do HDR shots during interval mode.  I also needed more lens.  Things to keep in mind for the next one.

I also got a couple of videos.  I sadly don't think Blogger will upload them at full HD, but hopefully they don't get butchered too badly.  The disappearing and reappearing effects were pretty neat.  And I had to get my crack about the sun being a cheap fluorescent bulb in.

The sun disappearing.  The video is unaltered, except for I cropped it (for size purposes), and ran it through Handbrake (with some minor deblocking turned on).  I have the uncropped version available if anyone really wants it.


And the sun reappearing.  Same deal as before.

Thursday, August 17, 2017

Another couple items checked off.

For starters, I had another casualty today.  Probably caused by me playing frisbee during lunch.  That being said, I double heat shrink wrapped it, and it is holding pretty well.  Time to get new glasses I guess.


I worked most of the way to sunset (I once again didn't get out when I wanted to), but then had to put the tarp back up, which is a real pain to do by oneself.  I did however, get all the hurricane ties installed, and all the ceiling beams are fastened, the two items I wanted to complete today.


It was a major pain, but I did get the tarp back up.  Took almost an hour, especially in the dark.


I also cleaned out the spare stuff out of my car, I am preparing for a trip to KY to watch the eclipse, so there won't be any posts for a few days.


Here is the final updated checklist before I take off.
  1. Square up the corners
  2. Attach ceiling beams
  3. Secure rafters and beams with hurricane ties
  4. Attach the subflooring to the trailer frame.
  5. Sheathe the roof
  6. *Install tar paper to make the roof watertight.  *5
  7. Install window framing.
  8. *Tyvek wrap.  *7
  9. *Install roof.  *6
  10. *Install siding.  This includes all flashing.  *8
  11. *Install attic vent and AAV (AAV = air access valve for the plumbing). *10
  12. Run the rough plumbing. (includes gas line for stove)
  13. Run the rough electric.
  14. *Install rodent barrier.  *4
  15. *Install insulation.  *10
  16. *Install flooring.  *15
  17. *Install ceiling and attic insulation. *13
  18. *Install light fixtures.  *17
  19. *Install paneling  *13, 15
  20. *Complete electrical and plumbing.  *19
  21. *Install final flooring (carpet/linoleum).  *16, 19
  22. Install interior fixtures.  When I get here, I will likely create a new list for the interior work.

Wednesday, August 16, 2017

Quick update; other side done.

I finished the other side today, so all the rafters that are hung (there are two still MIA) are now attached to the top plates.  I got out of work later than desired, so it took me all the way to sunset.


I had to prop up the ridge to get things lined up better.  I will probably build a support for it once I get a little further along.


One slightly disappointing thing is that even despite the braces and the whole roof now being attached, the walls still went back to being slightly tilted when I released the straps and everything.  at this point, there isn't much I can do about it, and it isn't bad, but it is still disappointing.  They are better than before, but still not square.  I might try straightening it back up and using longer braces so that the natural flex in the wood is less significant.  The siding is the last piece that will help hold it square, so I will need to look at it before then.

Not much movement on the to do list, but I am planning on leaving work a little early tomorrow and will try to get at least two and three done, maybe four if all goes well.  I picked up a spool of wire and the tar paper, so I have those at the ready just in case, though with everything so far taking longer than expected, I doubt I get that far.  Since the rain on Friday night has moved up to Friday morning, I can't wait until Friday to tarp it.
  1. Square up the corners
  2. Attach ceiling beams
  3. Secure rafters and beams with hurricane ties
  4. Attach the subflooring to the trailer frame.
  5. *Sheathe the roof  *2
  6. *Install tar paper to make the roof watertight.  *5
  7. Install window framing.
  8. *Tyvek wrap.  *7
  9. *Install roof.  *6
  10. *Install siding.  This includes all flashing.  *8
  11. *Install attic vent and AAV (AAV = air access valve for the plumbing). *10
  12. Run the rough plumbing. (includes gas line for stove)
  13. Run the rough electric.
  14. *Install rodent barrier.  *4
  15. *Install insulation.  *10
  16. *Install flooring.  *15
  17. *Install ceiling and attic insulation. *13, 3
  18. *Install light fixtures.  *17
  19. *Install paneling  *13, 15
  20. *Complete electrical and plumbing.  *19
  21. *Install final flooring (carpet/linoleum).  *16, 19
  22. Install interior fixtures.  When I get here, I will likely create a new list for the interior work.

Tuesday, August 15, 2017

Windows picked up and finally square.

The frame got wet, very wet last night.  It stormed heavily and the rain was pretty constant all night.  So much for that 10% chance of showers.  It was decent this afternoon though, and I worked through sunset.

I started the work today by picking up the windows.  None of them rattle, so I hope they are all intact.


They take up a lot of space.  My shed is now filling up with things to be installed.  You got the windows on the left, the door, the fridge and the stove on the right.


The big news for today though is I got the Frame all squared up.  I had to torque it a bit, but everything is now level in each direction.  Because I didn't have any help, I ended up strapping it and ratcheting it straight.


I put corner braces in.  These should be sufficient to hold it square.  I put one in each the X and Y axis.  It was already square in the Z axis.  They will be removed once the roofing is complete, which should be sufficient to hold it square.


I also had a problem with the long walls sagging out.  I fixed that right up too.


While not perfect, I started attaching the rafters.  I got the slab side almost complete (all except the last one on the road side).  All of them are within an eighth inch of flush, with none of them overhanging.  I haven't gotten the hurricane ties on yet, but am putting a screw in the ends and into the top plate.  I used a screw instead of toenailing in framing nails because from my experience when you toenail something in it will shift and is more likely to split.  I will be installing the ties at a later date, but that can be done once the roof is on.


I got a little bit of free time while waiting for things to compile at work, and made a rough updated floorplan sketch with the windows and with the extra length removed.  One thing I don't like is the stove is now right next to my desk, which seems like a bad idea.  I might put the small closet back in and take the extra length off the long closet.  I really ought to take a foot or two out of the desk/TV blocks, but I can't unless I want to downsize the TV or lose a monitor, neither of which are appealing.  I suppose I could try going vertical with the monitors, but I honestly don't know how much I would like that, and if I make the space too small, there is no going back if I don't like it.


I only checked off one item from the list, but most importantly it removes the asterisks from the roofing parts of the to-do list, and leaves only a couple of things before it is weather tight.  I need to finish screwing the rafters in and then it is just installing the sheathing and the tar paper.  I have noticed that I appear to have misplaced (and probably cut up for other framing) the last two rafters that I hadn't installed.  Kind of annoying.

  1. Square up the corners
  2. Attach ceiling beams
  3. Secure rafters and beams with hurricane ties
  4. Attach the subflooring to the trailer frame.
  5. *Sheathe the roof
  6. *Install tar paper to make the roof watertight.
  7. Install window framing.
  8. *Tyvek wrap.
  9. *Install roof.
  10. *Install siding.  This includes all flashing.
  11. *Install attic vent and AAV (AAV = air access valve for the plumbing).
  12. Run the rough plumbing. (includes gas line for stove)
  13. Run the rough electric.
  14. *Install rodent barrier.
  15. *Install insulation.
  16. *Install flooring.
  17. *Install ceiling and attic insulation.
  18. *Install light fixtures.
  19. *Install paneling
  20. *Complete electrical and plumbing.
  21. *Install final flooring (carpet/linoleum).
  22. Install interior fixtures.  When I get here, I will likely create a new list for the interior work.

Monday, August 14, 2017

Driveway inspected, prepped for the rest of the week.

I managed to get most of the lot mowed before the driveway committee showed up.  They like to talk a lot, but they pretty much signed the paperwork before they even walked the driveway.  I got the impression they thought it was ridiculous that they had to come out for an existing driveway that meets regulations with the exception of a paved apron.

Once they left, it was already closing in on 7, so I just finished mowing, since it really needed it.  It was almost knee deep in a few spots, and shin deep almost everywhere.

The picture I forgot yesterday of the hurricane ties to the frame.  You can see where I had to clear off the foam which is why it took so long.


I now have all the hardware needed to bolt it to the frame.   Everything is grade 5, which basically means that the frame will implode around the bolts, but the bolts will hold.


I also found this in the garbage bin at work today.  It isn't the wider stuff that I wanted, but this is readily available for free from work.  Despite being thinner, I think it will be more than sufficient to hold the frame from lateral movement.  It is steel too, which is good since I won't have to worry about mixing metals, which can lead to premature corrosion/rust.


Once I was done mowing, I decided I still had enough time to pull the tarp down so tomorrow I could get to work immediately.  Unfortunately, when I left work the forecast was nice for the next few days, and when I got home, they changed tomorrow to storms.  Grrrr.  Too late now, I can't really put that tarp up by myself, and certainly not in a reasonable amount of time.  I hope it doesn't get too wet.


On an interesting side note, I got an email that my windows came in today.  They weren't supposed to be in for another week and a half, that is why I ordered them when I did.  Good thing I have a big shed.

Due to the meeting with the driveway committee, another day with no movement on the checklist.
  1. Square up the corners
  2. *Attach ceiling beams
  3. *Secure rafters and beams with hurricane ties
  4. Attach the subflooring to the trailer frame.
  5. *Sheathe the roof
  6. *Install tar paper to make the roof watertight.
  7. Install window framing.
  8. *Tyvek wrap.
  9. *Install roof.
  10. *Install siding.  This includes all flashing.
  11. *Install attic vent and AAV (AAV = air access valve for the plumbing).
  12. Run the rough plumbing. (includes gas line for stove)
  13. Run the rough electric.
  14. *Install rodent barrier.
  15. *Install insulation.
  16. *Install flooring.
  17. *Install ceiling and attic insulation.
  18. *Install light fixtures.
  19. *Install paneling
  20. *Complete electrical and plumbing.
  21. *Install final flooring (carpet/linoleum).
  22. Install interior fixtures.  When I get here, I will likely create a new list for the interior work.